Tuesday 30 December 2014

The Osprey

For my latest painting I decided to paint a bird of prey - the osprey. And, to make it more challenging, I wanted to portray it in a more active and dramatic scene where it was fishing. I hope you like it!


With wildlife I try and make sure the animal I am painting is identifiable as a species. For this, as well as using what I can see, I also utilise ID guides in this case my trusty Collin's Bird Guide.


The osprey is one of the most widely distributed birds on Earth; spanning every continent except for Antarctica. In the UK it occured widely in the past but was persecuted as it competed with people for fish. The increasing pressure from firearms usage in the 19th century saw the osprey as well as the sea eagle pushed in extinction in the UK by 1916. In its final years, as it became rarer, the osprey became the target of trophy hunters and egg thieves. In England the last breeding pair was likely in Somerset in 1847. In wilder Scotland the population clung on longer, retreating into the Highlands where the last known pair nested at Loch Loyne in 1916. 

It was in 1954 at Loch Garten, Speyside, when a Scandinavian pair of ospreys was found to have recolonised Scotland and were breeding and the population has slowly climbed from there. As the population was slow to colonise opsreys were reintroduced to England at Rutland water in 1996. Later a pair bred in Kielder Forest in 2009 - the first to do so for over 200 years. Today the osprey population has reached a modest 200-250 breeding pairs. Sadly most breeding sites have to be kept secret as well as guarded to protect from would-be egg thieves and hunting - egg collectors have stolen over 100 clutches of eggs since the 1950s.
The painting in progress:


Monday 15 December 2014

Oil Painting for Beginners

So this week I thought I'd tell you the basics of what you need to know to start oil painting. From what tools and materials you will need to how to go about creating your painting. I've probably missed a couple of things out but I've certainly picked up some useful information through art college, art books, and experience that I can share with you.

I'm not going to be telling you HOW exactly you should paint. People want to paint different subjects in different ways and developing your own style is something that comes from practise and experience. This is intended to be a handy guide for anyone looking to take up oils.

So let's begin!

What you'll need:


  • A paint surface

Typically this is cotton or linen canvas but you can also work on wooden boards including MDF and hardboard. You can even paint on paper to a degree.

Canvas comes in various levels of coarseness. Some artists like roughly woven canvases to feed into the texture of their work whilst others prefer finer canvasses to allow small details to show through. You can buy canvasses already set on a frame or loose canvas which you can frame yourself. Framed canvasses come in both primed and unprimed states. Priming a canvas is important as the oils will absorb into the canvas which over time may lead to rotting. If you buy an unprimed canvas you will want to coat it in a few layers of acrylic gesso to create a good surface to paint on. Sand it down to create a finer surface.

When buying canvas check to make sure it has a smooth surface for you to paint on. Look out for any rips, dents or bubbles.

It's best to prime boards too to create a better surface to put paint on. You can paint on paper but as this is such a thin material it is even less durable and is best for sketches and studies rather than larger projects (ideally prime too). Be careful of the paper warping due to moisture. Oils can seep through paper relatively quickly.

The surface you paint on will affect drying time along with the thickness of paint and the mediums you use. I personally find that hardboard takes longer to dry than canvas.

Oils coming through the paper


  • Brushes

Technically you don't have to apply paint with a brush you can try out anything you want - plastic cards, fingers, sticks, but most artists use brushes to create accurate mark-making.

I recommend buying a wide selection in brush sizes. Use broad brushes to paint large areas and to apply gesso, and finer pointed brushes to work on small details. You don't want to be covering a massive canvas using a tiny brush - it will wear it out plus take forever! Brushes come in natural hair as well as synthetic. You can also use a palette knife to mix colours and apply paint thickly onto the paint surface. 

Make sure to thoroughly clean your brushes when you have finished a painting session with lots of soap, particularly for synethic brushes to prevent damage. The lifetime of brushes varies between artists and depend on their size. Some artists will get through small brushes in one painting, others can make them last a few months. You'll know when they need changing as the hairs will splay making mark-making difficult.


  • Paints 

:
There are broadly two ranges of paints to choose from:

Student paints: such as Winton, are cheaper paints as they contain more filler and less pigment. They are generally for those new to the medium or on a budget.

Artist's paints: contain more pigment and are smoother to paint with but can be very expensive. Prices also seem to vary more depending on the colour. 

Water-mixable oil paints are also now available as an option. These eliminate the need to have a solvent which saves on costs as well as odour. I do have a couple of tubes of these paints but I've yet to try them out so I don't know how different their paint is or how well they dry.

A good starting palette of colours would be warm and cool versions of the three primaries: red, yellow, and blue, white, and black (see previous blog post here). When painting wildlife the earth pigments (siennas, ochres, and umbers) can also be very useful. You'll find a few whites and blacks on sale which can be confusing, titanium white is the brightest white and lamp black the darkest black.

A little word of warning: I find it's harder to notice when you get oil paints on your skin than with water-based paints so it can be easy to unknowingly get it on your clothes and everywhere else in the room. So always make sure to check!


  • Mediums

With oils you will most likely need to use a solvent to dilute and mix the paint as well as to rinse of paintbrushes. The exception to this would be if you are using water-mixable oils. This also helps you paint fat-over-lean which becomes important as your painting dries (more on that later). 

Solvents can be damaging to the environment so make sure you absorb with rags or tissue and dispose of in general waste and NEVER tip down the sink.

Turpentine is traditionally used but you need to make sure you paint in a well-ventilated area as it is strongly odoured. An alternative is to use a low odour solvent such as Sansodor but this is more expensive.

White spirit can be used to rinse brushes as it is cheap but shouldn't be used as a painting medium as it is much more corrosive. It also produces fumes and binds less well with the paint.

While painting I find it best to pour some of the solvent into a glass jar to use. This prevents paint from brushes contaminating the rest of the solvent. Make sure to keep a lid on when you are not currently painting to prevent fumes and evaporation. Avoid storing in plastic containers as the solvent will eat the plastic away.

Linseed oil or Liquin, is used to add extra oil to paint. This allows for the build up of glazes in later layers and painting fat-over-lean. Liquin also speeds up drying times.


  • Palette

You will want a surface to squeeze out fresh paint onto so you can mix your colours. Avoid plastic as this will be corroded by the mediums and use wooden or glass palettes. Large palettes will give you more room to mix your paint on which is arguably more needed in oil painting than other mediums as the paint takes a longer time to dry on the palette. I find it best to put your colours around the edge of your palette and mix inside to prevent the paint from spreading out so much in all directions and so you know where the base colours are. Try not to put more paint than you need on your palette as will waste your paint.

  • Extras

An easel can be useful, particularly for larger work. You can get table easels as well as full tripod easels. For smaller works you can get away without using one.

Tissues are also useful to place wet brushes on as well as to wipe them dry.

Now how to start your painting!


How to paint:


  • Sketching

It can be a good idea to sketch ideas out in a sketchbook before moving to canvas to come up with your painting's composition.

One method of composition is to use the rule of thirds. The idea behind the rule of thirds is that the canvas is divided into a 3 by 3 grid and the key focuses of the image should be the points where the grid intersects (see the dots in yellow on the painting below).
Grid system & the rule of thirds
Angles and lines of objects in the foreground and background lead the eye around the image. You can use them to focus on the features of your painting or to take them on a tour around it.

If you are working from references you will probably want to accurately transfer your idea onto your painting surface. You can do this by sketching the design using diluted paint, pencil or charcoal. If you use pencil or charcoal you will want to seal the drawing with a thin layer of acrylic paint or gesso to prevent the drawing from muddying your paint.

You can increase your sketch's accuracy by using a grid system to break down your reference and canvas into smaller chunks to transfer. Another option is to project your reference onto the canvas.

If it is likely or possible the painting will be later framed you will want to move the image inwards away from the edge of the painting area a little as the frame will crop the image space.


  • Painting Tips
Angle of painting 
Avoid painting on a horizontal surface such as a tabletop as this will likely skew the image's proportions based on your angle of viewing. This is why easels are useful tools to hold paintings.

Fat over lean painting 
It is important to paint fat over lean in oil painting to prevent the paint surface from cracking whilst drying. What this means is that if you are painting using layers to build up paint on the canvas each subseqent layer needs to have a higher fat or oil content than the last. This can be done through diluting early layers with solvent and adding oils such as linseed to later layers.

Good things come to those who wait
Paint layers will vary in how long they take to dry based on added mediums and thickness of application. Expect relatively thin layers of paint with no medium to take a couple of days to dry. This will also vary based on the surface you are painting on. Be careful not to overwork a wet painting as this will likely end up muddying your colours and dilute your highlights and shadows. Wait for the layer to dry before starting the next.

Paint what only what you see..  
..not what you think should be there. Putting details that you think should be visible but aren't actually visible from your references can actually take something away from your painting and make your image seem 'unreal'.

Lighting
Be aware of the temperature of light and complimentary colours. A warm orange sunset casts blueish shadows for example. Also pay attention to the direction of light and shadows, their depth and length and make sure they match.

Define your foreground
By softening your backgrounds you bring foreground objects forwards. Usually distant objects/landscape appear lighter than foreground objects as well as less detailed to the eye

The Mirror Trick
Something I call 'Painting Blindness'' occurs when you've been looking at a painting for a long time. This means problems within the image such as distorted proportions, and contrast can become difficult to notice. An easy way to double-check your image is to get a 'fresh look' at it using a mirror or to upload a photo of the painting and flip it horizontally using an image-editing program. That way you can see if there are mistakes you need to fix. Always carry out when you think your painting is done so you can make final touches as necessary.


Well I hope that helps. I'm not an expert but I've been using oils for about 10 years now so this is what I have managed to pick up. I personally don't believe art information is the privilege of the few to keep secret or dole out at a learner's cost. Indeed i think it's a shame that so much information remains unsaid in art institutions. I hope this provides a useful resource so a beginner can get started and enjoy what oil painters do!


Thursday 4 December 2014

International Cheetah Day

So today, December 4th, I discovered that it's International Cheetah Day. I became especially fond of these graceful big cats from when BBC's Big Cat Diary was on our TV screens as a kid. So I thought I'd use this opportunity to talk about this fantastic animal and bring some awareness to its current plight as it is a species listed as vulnerable to extinction.

The Cheetah (Acinonyx jubatus) is the fastest living thing on Earth and can reach speeds up to 70mph, that's the speed limit on our motorways! They are wonderfully adapted for speed and an evolutionary arms race to be faster and faster between them and their prey has shaped their form. They are the only cat with non-retractable claws for increased grip and their long tail acts like a rudder helping them to turn. Their barrel-shaped chest and enlarged nasal passages, lungs, and heart help them take in as much oxygen as possible to fuel them in the chase.

Chases are extremely exhausting and cause body temperatures to spike so cheetahs may need up to an hour to get their energy back. During which time they are vulnerable to having their kill stolen. As cheetahs are made for speed not strength they are very vulnerable to other predators such as lions, hyenas, leopards, and others. Predation is biggest problems that cheetah cubs face along with a susceptability to illness though the species low genetic diversity. 90% of cheetah cubs don't survive the first three months. 

Painting of Toto from Big Cat Diary - he sadly didn't make it

Cheetahs are not true big cats as they lack a bone meaning they are unable to roar, but they can purr. This was something I heard very loudly when bottlefeeding a pair of cheetah cubs when I was out volunteering at Moholoholo Rehabilitation Centre in South Africa some years ago.


They have tawny fur with simple black spots and distinctive 'tear tracks' running from eye to mouth, They are largely solitary although males may form coalitions of 2-3 to hold territories against other males. They are diurnal predators relying on sight and speed, as such they prefer large open areas of grassland in which to hunt their prey. 


Cheetahs used to be a lot more numerous than the estimated 12,400 or so in the wild now and ranged heavily into Asia. In ancient times they were used as hunting companions and were kept as pets by royalty including Egyptian Pharaohs. Indian Emperors, and the likes of Genghis Khan. Now there are only an estimated 40-70 cheetahs left in Asia, in Iran and are threatened by the rise in road-use and mining traffic in the only areas they remain. 

One of the biggest problems is the lack of genetic diversity in cheetahs meaning their fertility rates are very low. This is due to a population bottleneck around 1000 years ago which lead to the population becoming extremely inbred. So much so that during skin grafting operations there was a failure to reject the new tissue as foreign, something that occurs in most animals. In fact the stripy and blotchy King Cheetah fur-patterning, although beautiful, is a sign of even lower genetic diversity present in cheetahs.

However this cannot be held entirely responsible for the fall in cheetah populations as this has occurred more recently in the last 100 years or so as farmland has encroached on cheetah habitat. This has led to competition with people for their wild prey. Livestock predation is a concern but cheetahs prefer wild prey when available. So it is important to educate people about this. Whilst I was in Africa the pair of male cubs that I helped bottlefeed were being hand-raised so they could be brought to schools and meet other people. This was to help educate children about cheetahs and hopefully help to protect them in future.

So help bring awareness if you can, be it on twitter or Facebook let people know about International Cheetah Day, and donate if you are able. Cheetahs are so unique and play an important role as predators in the ecosystem. I think it would be such a tragedy if we were to lose them.


Find out more here:

International Cheetah Day

Cheetah Conservation Fund

Friday 28 November 2014

A Day in the Life of a Countryside Volunteer

I squint at my alarm clock.

6:37am.

Only a few minutes before the thing starts shrieking at me to get up. May as well get up now.

I plod downstairs glaring at the overly bright hall light waiting to greet me that dazzles me as I pass and make myself a cup of tea. I pack my things, ready my wet weather gear (wisely distrusting the Met Office's predictions for the day), and bid farewell to the dogs as I head into town to our vehicle pick-up point.

Thus begins my rather sleepy start to a day as a countryside volunteer.

Getting into town early I have time to buy a sandwich for lunch. I always feel rather awkward walking around town in my conservation getup. Layered up for outdoor winter work I bear a striking resemblance to the Michelin man. This is topped off with waterproofs and work boots that have seen better days with a patina of rips, burn-holes, and ingrained mud.

I look homeless. I think if I sat in the subway I could earn either small change or abuse; perhaps both. Some days I feel half-tempted to try it out as an experiment.

There's some time before we are collected to head to our place of work for the day and my inner-hobo instincts lure me to a park bench where I sit and read a book or magazine until it's time to gather. From where I sit I can see the river than runs through one end of town. It's swollen and tawny from the recent rains and I wonder whether if we'll see flooding again this year. Other volunteers slowly emerge from town and we chat as we wait for the landrover to arrive.

Our group is popular so some volunteers turn up in their cars - necessary to accommodate all our number. The work vehicle arrives and we head off in a small convoy to a nearby farm to work on a hedgerow that runs along one of the fields.

The sky is heavy with rain and the ground sodden with each step causing water to well-up to the surface. We set about building a fire but it's going to take awhile to get going in these conditions. Luckily we have Simon who's an excellent fire-starter.

Our task is to coppice the hedgerow running along the field's edge. All hedgerow plants want to become big trees so eventually hedegrows become gappy at their bases. Coppicing is an ancient method of woodland management and is useful when hedgerow trees get a little too big to be managed by trimming or hedgelaying. By cutting the trees down in winter it allows for the collection of wood whilst leaving the buds below the cutting height to respond by putting up new stems. This leads to a flush of dense vegetation growth the following seasons.

These trees had been cut before and each one is a labyrinth of stems contorted over one another so it can be a bit muddle. Brian remarks that he enjoys solving the puzzle of where to begin.

We cut every third tree using a combination of loppers, bowsaws and handsaws. They are then cut down to ground by Andrew who's wielding a chainsaw. By chance mine is tiny and at morning tea break I cheekily tell Jenny and Angie that I've already finished mine when they've been working on theirs' since last week. Tea breaks are getting more luxurious in our group with an increasing selection of biscuits and home made cakes. Tasty and energising food to fuel our labours!

Cuttings from the hedgerow are divided between long twiggy branches to be bundled and thicker straight branches suitable to be used for stakes. These will be taken to be used for  our summer river work. The rest fuels the warming fires.

We stop for lunch and a chat. The muddy field means our group is divided between islands of dry seating in a muddy sea. Angie and I sit on our tarpaulin raft and talk about whether it's cold enough to start making soups yet.

I find a cache of hazelnut shells amongst one of the stumps. The chiselling on the inside edge of the hole tells me that it is probably belongs to a woodmouse from last year who had been eating them. 


Hedgerows are important for wildlife such as woodmice and birds including protected species such as dormice so maintaining hedgerows is important in connecting up habitat as well as being a standalone habitat in itself. It's a shame that so many hedgerows I see in my local area are in a poor neglected state or have been completely replaced by fencing.

We strap our bundles of branches onto the roof and trailer, effectively camouflaging our vehicle as a large bush and drive back into town to be dropped off. I'm tired with soggy feet and covered in thin film of mud, algae and sawdust. But despite that seeing the hidden places we get to visit, chatting and joking with the group, and carrying our work that's going to help our wildlife -  it's always worth it!


Wednesday 19 November 2014

Painting in Progress: Dash & Elmo

Hello everyone,

today I thought I would share with you a commission I am currently working on. This is a portrait of two dogs Dash and Elmo. It's by no means finished yet but here's how the painting is looking right now. 


I have a mix of references I'm using.  Although I'm focusing on two for the faces I have a couple of others to help me with Elmo (the labrador) to balance out the flash and so I can work on his body a bit too.

I chose these two to work from based on the level of detail and the angles. Plus Dash looks really great against the soft-focused grassy background!

Here are the stages up to this point:


Monday 10 November 2014

Christmas Cards

A while back I shared with you the making of my painting A Winter's Day which I mentioned that I thought it would work really well as a Christmas greetings card. 

I've just set up the painting on Fine Art America which is a Print-on-Demand service so for the first time I am able to offer prints and to anyone worldwide!

Now from what I understand FAA is predominantly aimed at the North American market. I saw mentions of opening a printing option in the UK this year but that seems to be aimed at metal printing so be aware that UK orders for cards would be shipped internationally. I hope to have a proper UK option in future but at least this enables something for the North American folks!

If there's other paintings of mine that you would like to see on offer as a card leave a comment and let me know and I'll see about setting it up.

Monday 3 November 2014

Charity Postcard - Leopard Portrait

The exhibition to sell artists' postcards to raise funds for Save the Children has now ended so I feel that I'm finally able to share my painting with you as it had to be anonymous before now. Unsurprisingly I chose an animal theme for my postcard and as the size was so small I chose to paint a close-up portrait of an animal rather an a larger scene so I could capture more detail. I photographed it as I went along so you can see the stages of the painting.

I attended the artists' preview the eve before the exhibition was to be opened so was able to see all the postcards as well as find out whereabouts mine was. It was fun to see it there on the gallery wall and it had even sold by the time I found it!

Here is the finished painting in my hand. Read on to see the stages of how the painting was made below.

Although it was stated the card was suitable for oils I decided to further prime the surface with gesso and finely sand it so I had a smoother surface to work on which I prefer for fine mark-making.


Using thinned down paint I sketched onto the postcard marking on the facial features which included the spots as well as the eyes, mouth and nose. You can just about see the horizontal lines I used to make sure they were aligned which helps prevent proportions from getting skewed. The eyes look a bit creepy at this point as there are no highlights just some general colours and darks. I've also begun blocking in the muzzle colour.


I've added in the highlights to the eyes and it makes such a difference. I've also built up the colour in the eyes and added some detail to the irises. I also added some texture to the nose and roughed out most of the spots and fur below the head which I want to keep fairly lose so not to distract from the face. I also started to add some darker details and colour to the muzzle.

The darkening continues with the cheeks being blocked in. I've also added some fur highlights under the head and around the eye including 'eyelash'-like hairs which helps settle the eyes into the rest of the fur.


The highlights are growing further, working their way to the bridge of the nose. Dark details have been added to the checks and I just started work on the mouth. The same process of blocking, darkening and highlighting continues until the face is done and then the fine details of the whiskers are added to complete the image.

I hope you like it!


Monday 27 October 2014

Iceland in Autumn: What's that Bird/Blur?

Despite the inclement weather there were some opportunities to do a little bird watching and practise my identification skills. There are a lot fewer species of bird in Iceland than in the UK and the vast majority are migratory owing to the cold and dark winter months. For example there's just one corvid species; in the UK we have eight.

Now identifying can be easy when working from fantastically clear photographic shots of birds from good angles showing birds in handsome breeding plumage. And where you have all the time in the world to look at it. Bird-watching out in the field, for a novice like me, can be something quite different. The birds stand off far in the distance, sometimes being antisocial with their backs turned to me or tucked-up half asleep, or moving quickly by. I have no telescope or huge-lensed camera so squinting at birds, trying to remember what I need to look for when they're constantly moving, and identifying them I find much trickier outdoors.

As such I've got a little bird-ID quiz for you and I've included photos that were pure snapshots to ID birds based on features as they flew by. Good enough to ID them, but not great photographs. If you've read some of my Iceland trip posts then there may be a few clues in there to some of the birds. And if you don't know much about identifying I'll include the identifying features in the answers at the end of the quiz. So don't scroll down too low and cheat!

So grab a pen, there are 15 birds to identify! Most of them are coastal, some are rather scarce vistors to the UK. There is one bird we don't get in the UK which is number 8.


What's that Bird/Blur?


All done, how'd you find it? Before we get to the answers, and so you don't accidentally see them too early, there is one last part of the trip to mention.

One of the last sites we visited in Iceland was the last known colony of the Great auk. This was a largest of the auk species which fill the same evolutionary niche that penguins do in this hemisphere, and the Great auk itself was flightless. The species was hunted to extinction when the last pair were killed in 1844. Ironically, and terribly, their rarity made them more vulnerable to extinction by becoming the target of rare collectors. The colony itself was actually off the coast of where we were on the small island  of Eldey just visible to us through the mist. A bronze statue on the mainland stands in memorandum to its demise, and its culprit, us.

Bird Quiz Answers

1 - Gannet (large white bird, pointed wings, black tips)

2 - Fulmar (not a gull but a member of the Procellariidae family who have a tubular part on their bills to dispel salt water. Has grey wingtips - gulls have black or white, and flies stiffly and impressively around steep cliffs and rolling waves)

3 - Great black-backed gull (large gull. Black back with pink legs. Lesser black-backed have yellow legs)

4 - Glaucous gull (one of three main gull species that have white wingtips. One of the others is the all-white ivory gull. Looks like the Iceland gull but has a fierce-looking face with sloping forehead and is a bigger gull)

5 - Sooty shearwater (An all black bird at sea that 'shears' the air across the waves with long wings)

6 - Razorbill (in winter plumage, can be identified from the other black-and-white guillemots by the white on the head extending upwards behind the eye and a lack of side-streaks on the white flanks, chunky bill)

7 - Black guillemot (winter plumage, retains a distinct white patch on its wing, also has red feet)

8 - Harlequin duck (female duck is dark brown in winter but has a diagnostic white spot on the cheek behind the eye)

9 - Eider duck (this male is in eclipse plumage as it is so dark but retains white marking, eiders have distinctively shaped 'triangular' bills that appear goose-like)

10 - Merlin (Iceland has only two birds of prey: the Merlin and the Gyrfalcon, this male merlin can be identified by its small size and rufous chest and slate colouring to the head and wings)

11 - Great skua (a predatory seabird, great skuas are heavy-looking birds with distinctive white 'fingers' to their wingtips on the underside on an otherwise dark brown bird)

12 - Raven (Iceland's only corvid, has a heavy bill, metalic sheen and a paddle-shaped tail in flight)

13 - Whooper swan (Iceland's only swan. Has a yellow and black bill with the yellow in a triangle-shape)

14 - Snow bunting (winter plumage, has a stubby yellow bill and white wing panels on a brown body)

15 - Redwing (a thrush with rusty red patches under its wing, in the UK it can be distinguished from our thrushes by its obvious supercilium (think 'eyebrow') and moustachial stripe (coming down from the beak)

If you're looking to learn how to identify birds. I recommend the Collin's Bird Guide. This is a guide to species in the UK as well as the rest of Europe and includes pictures in various plummage variations, diagnostic features, descriptions, and where and when they are. The book is commonly seen as one of the best for identification and helps you learn more about the natural world around you.

There are also some quizzes online to practise your ID skills. The one I would recommend is called birdid.no. This a Norwegian site that also offers some ID on mammals and field signs as well as birds. This quiz allows you to pick your own country and level which makes things easier to learn.

Another option is 'Cbirding' a german website which is for all European birds. Personally I find this can make it quite hard and confusing on the higher difficulties if you are not familiar with a lot of European species.

Well that's it for Iceland now, it was a good trip but the sun has finally set on our time there. Next week - art!

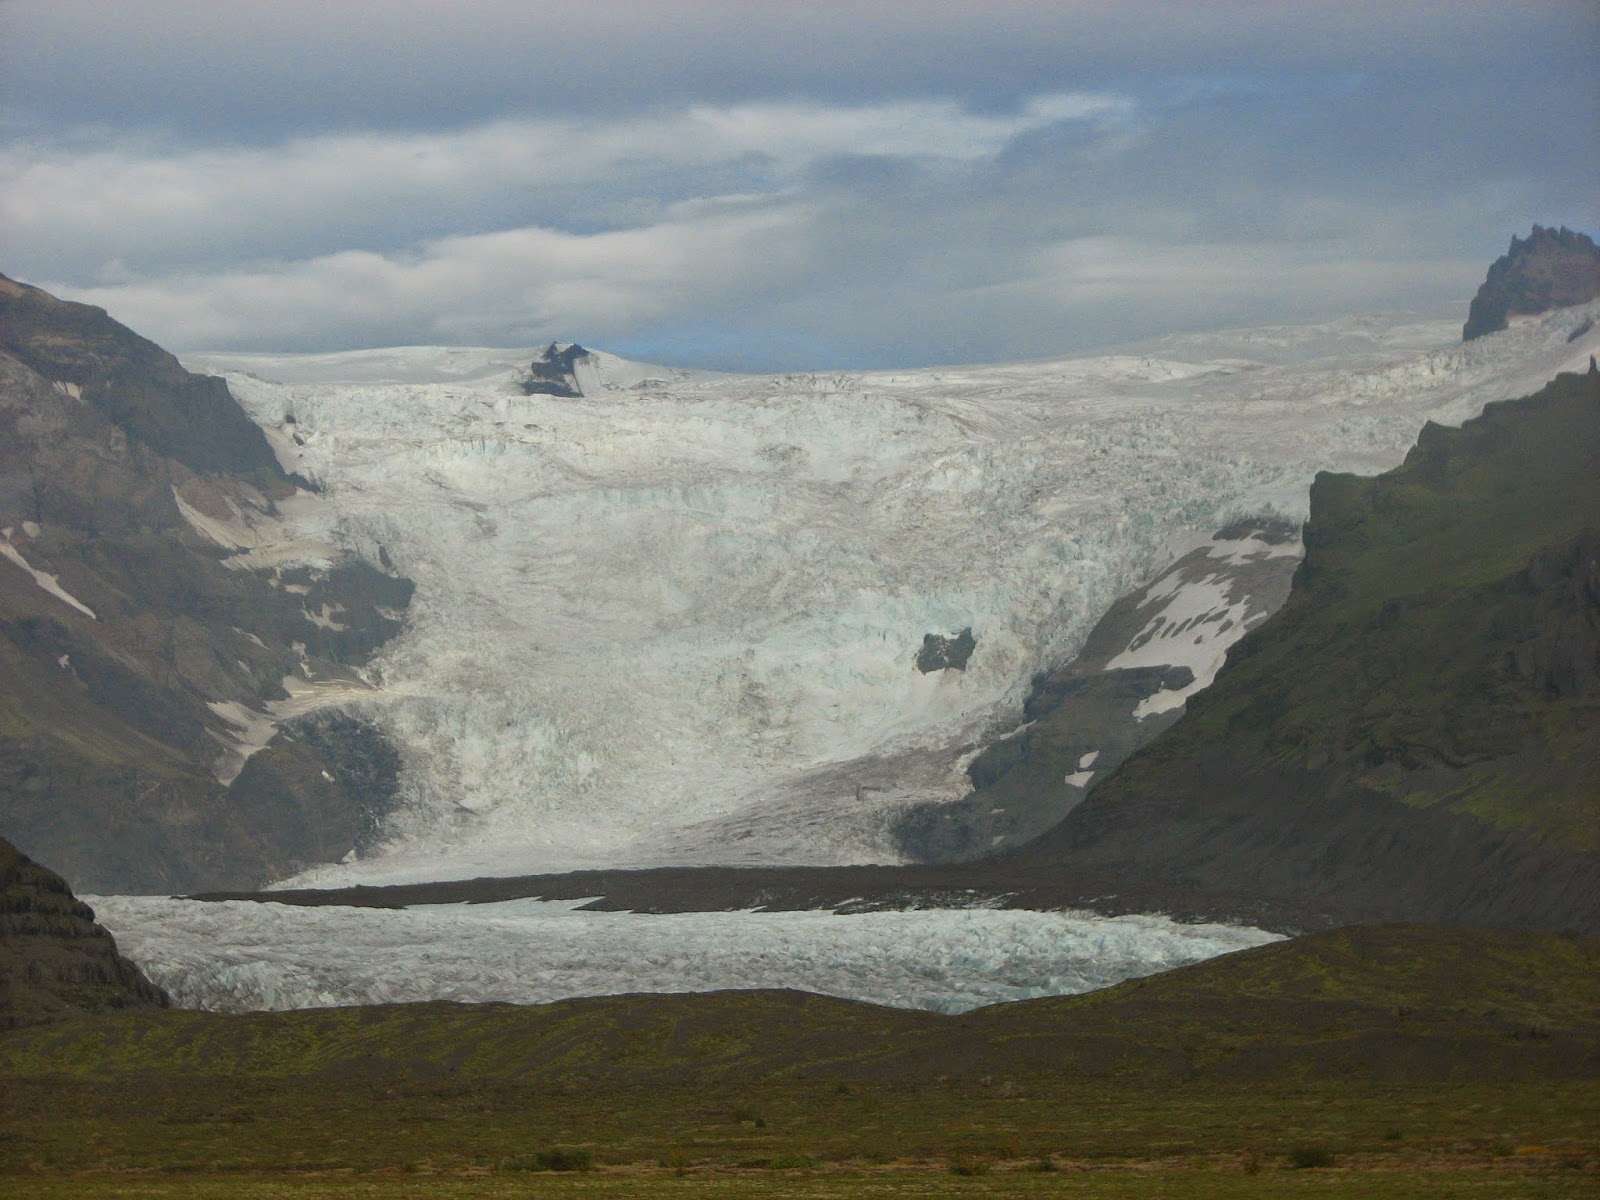
The sun sets on the mountains and glacial waters of Iceland


Tuesday 21 October 2014

Iceland in Autumn: ..& Ice

Iceland in Autumn

..& Ice

Alongside the volcanoes and tectonic plates that form the base of the country it is the ice of the glaciers that carve out the landscape of Iceland. Great ice caps on the mountain ranges slide down the slopes as glaciers and stream out craggy rocks as waterfalls as they make their way towards the ocean.

Our second hotel along our trip sat at the base of the great Vatnajökull, Europe’s greatest icecap, which sat like a great dome upon a seat of mountains and volcanoes. Great outlet glaciers poured down the mountainsides like great torrents of water frozen in motion. Clouds seemed to pour out of the glaciers too like breathe condensing on a cold day. Braided channels of meltwater flowed out into the black sands towards the coast. These channels are what had made road-building difficult here for so long. A main road was finally built around Iceland in 1974 after these channels were merged and bridged although great contorted heaps of iron sit alongside the current bridges, a reminder of a volcanic eruption and subsequent flooding in 1996 that saw the original bridges pulverised by water and colossal icebergs the size of houses.
Svínafellsjökul
From our hotel we walked towards the outlet glacier Svínafellsjökull on a small winding path. The ground was black and littered with gravel and great chunks of ice near us were sooty from the volcanic ground and dripped into icy pools. We walked right onto the foot of the glacier but no further as we were without a guide, crampons and ice shoes. Great crevasses cracked the glacier making it dangerous to proceed unless you knew where you were going. The glacier was a mass of small peaks and pools reflecting the mountain above. Slabs of ice were banded with debris and in places the ice was blue from the sheer volume of ice that squeezed out any air.
My mum and I at the foot of the glacier
 

We headed to Jökulsárlón, the iceberg lagoon, where icebergs are calved off from Vatnajökull before then drifting out in to the Atlantic Ocean. The lagoon is around 80 metres deep on average and up to 100 metres in places and is growing in size as Vatnajökull retreats. The ice that floats by is around 1000 years old in a mix of fresh melt-water and salt water from the Atlantic. The salt water means the lagoon is largely kept ice-free as salt water needs a lower temperature of around -5 to freeze than fresh water. This was exploited in order to film a car chase in the Bond film Die Another Day where the channel leading to the Atlantic Ocean was plugged. This prevented the salt water entering the lagoon allowing Jökulsárlón to freeze in a couple of weeks.


Jökulsárlón was impressive and beautiful. Icebergs of all shapes drifted by. Some were white, rugged and snow-like. Others were blue, having recently flipped over to show the compressed ice that hadn’t been exposed to the air. Others were clear and glassy or striped black with volanic dust making them resemble humbugs. 


Gulls and fulmars sat on the ice, unaffected by the cold and common seals swam slowly along. A lone harlequin duck drifted behind an iceberg as a great skua skimmed through the air. On the rocky channel that escorts the water and icebergs out of the lagoon purple sandpipers and turnstone poked around the rocks.


We took an amphibious craft out onto the lagoon to tour the icebergs. One of the boat staff brought up a slab of ice, clear and faceted like diamond and chiselled off pieces for us to eat.
Glacial ice.. great in drinks!

After our boat tour we followed the icebergs out to sea to the black sand beaches. Here some icebergs had stranded and small fragments sat on the shore glinting like glass. Close up you could see they had been carved into fantastic shapes by the waves and would look at home in an art gallery.


To me, Jökulsárlón was the highlight of our trip and so it marks the end of my Iceland posts about the landscape here. I still have a little bird quiz to come if someone wants to practise their bird ID skills (we get most of the species I saw in the UK too so it's useful for British Birding) as well as the tale of the Great auk.

I'll end with my two favourite photos of the ice here. I hope they demonstrate how amazing this place is.