Showing posts with label wildlife painting. Show all posts

Sunday, 10 April 2016

Great Northern Diver Painting

The great northern diver is a bird I've seen just the once whilst on holiday in Iceland. They do visit the UK but only really in the northern parts of the country in the winter when they aren't in their handsome looking breeding plumage.
 
A pair of courting divers
It's a bird I've been wanting to paint since I've started oil painting but have put off until now as it's patterns and colouration are complex mix of spots, checkering, stripes, and with a 'metallic sheen' on the neck and head of the bird. So I wanted to make sure I'd be able to do it well enough for my liking.

First I sketched out the position of the bird in sepia and then did a couple of layers of background colour using a fan brush for softness and opacity.

Then I worked further on the background bringing in the colours of the ripples up to the bird. This was followed by washing in the base colours of the bird and building up the opacity of that. The great northern diver naturally has dark red eyes and at this early stage with the lighter washes it was looking pretty demonic!


After that I started to build up the opacity and shades into the bird. 


Then I began detailing the bill and the eyes (so it looked less possessed). The neck and head was given a greyscale toning to it so I could glaze in colour which I thought may help give a metallic look to it


I moved onto working on the markings of the feathers and started adding the dark and bluer ripples in the foreground water and the water droplets on the bird's head.


The glazing of colour into the neck and head then took place and I worked on the more abstract looking ripples of the bird's reflection. The foreground water was also gradually build up with various shades.


The colour glazing continued on the neck and head and the final lighter tones added into the ripples to complete the painting.


Saturday, 26 March 2016

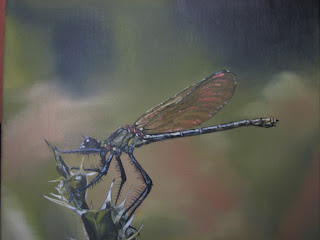
'Dragonfly' painting

.. well a banded demoiselle really but that's close!

Apologies for the long break between the last blog post until now. I have been very busy of late and also found myself a bit burnt out so needed a break from wildlife painting. but now I'm back and have been working on two of them. One of which is now finished.

I hadn't painted an insect in a while and was going through my college work where I had done quite a few and I decided to make use of a photo I took when I was at Hothfield Heaths nature reserve of a female banded demoiselle. Females are greenish with copper tinted wings where as the males are blue bodied with clear wings with black 'bands' near the ends; hence the name.

I planned out my painting with an initial sketch of the damselfly and thistle in burnt sienna before then working on the background, trying to retain the sketch for when I paint them later. The background was done in two layers using a fan brush to produce a softer look.


I then moved on to work on the thistle, working with a base colour wash and adding increasing highlights and shadows as I go.


I use this same method on the damselfly, here you can see the initial dark wash on the body.


Once the dragonfly was blocked in I then added some details in the eye and thorax and highlights to the legs. The thorax is mainly done in greyscale so I can glaze in colour as there is a metallic sheen to the insect which my standard colours would struggle to bring out.


Colours are glazed along the body and I tint the wings copper before then adding the veining on them and start working on all the colours in the wing highlights of which there are gold, green, blue, pink, and copper.

I add white and again glaze colour into the insect to help bring out the colours and add the final details to the wings.

I hope you like my portrait.


Sunday, 29 November 2015

Ocelot Painting So far..

So this is the first time I've attempted a grisaille painting method on a wildlife painting. I'm currently working on the tonal greyscale painting and then I'm going to glaze in the colour later. Here are the first three stages:


In the first stage I use diluted paint to sketch out the ocelot on the canvas along with a quick wash of the background.
Once this was dry I roughed out the base tones of the ocelot along with the markings. This stage actually took forever to dry so in future I'm thinking of adding a little liquin to the paint I'm using. Liquin is a thin medium which is added to paint for glazing but which also speeds up the drying time of paint.
This is where the painting is at following the second layer of paint. The aim at this stage was to make sure the background is dark and that the base tones, shapes, and markings of the ocelot are done to where details can then be worked in. Generally this will mean the lightest highlights and darks will not yet be present and the tones themselves are a couple of shades darker so I can put in the lighter fur details later.

Sunday, 26 July 2015

Wildlife painting part 2

Here's is the second part of the progress of my clouded leopard painting.

So this is where we left off from last time:

As you can see the leopard itself was largely incomplete.
As I began to texture the legs and face I realised that I had skewed the image somewhat and the ear on the right side needed correcting along with the slight lean visible in the back. Sometimes these things happen with paintings and you need to tweak them into shape. I also added some dark textures into the branch the leopard was walking along.
Having adjusted the issues I found I added some more texturing to the branch as well as putting in some more foliage into the painting along with the whiskers.
Finally I added some more toning to the leaves and branch and gave more definition to the raised paw and lightened the face a little. Hope it's done now, just need to think of a title :)


Thursday, 25 June 2015

New Wildlife Painting..

Following my trip to the local zoo a few weeks ago I've started a new painting. It's still very much not done but here are the first few early stages of it.

Points if you can tell me what animal it's going to be ;)


Monday, 16 March 2015

Work in Progress: Puma Complete

Welcome to part 3 of my work in progress of my Puma painting.

After spending so much time working on the extensive rocky background it was a relief to get painting the puma. The background still however isn't complete at this stage. The trees to the right and left of the puma need to be worked on. I've made a start on the tree on the right as well as some rocks and snow in the foreground.


It might seem that I'm building up the puma in an unusual piecemeal fashion, and maybe I am, but I'm making sure to work the furthest back parts of the puma first as there is some overlap of limbs and paws for example. I find this works to give more of a natural overlap than just painting it all at once.

As the sections are built up I add more detail before moving onto the next section. I've added some of the snow detail in the branches and ground at this point.
With the puma nearly done (just a few head details to go) I work on the tree to the left, just visible in this shot. The snow on the ground and the right-most tree is done and I just have to add it to the remaining tree and darken the side of the tail a little.


And there finally done! I hope you like it.

Wednesday, 25 February 2015

Work in Progress: Puma 2

Following on from the start of our painting last week I've began to work on the background. Unfortunately I'm not as far along as I would have liked by this point due to the black paint that I used for the shadows being a little 'too oily', hence that after a week and a half the paint is still not totally dry. To improve the situation I've removed some of the black paint and reapplied it diluted with a little liquin which is a fast-drying oil medium. Hopefully this should solve the issue.


I've been working on the rock texture and using light to add volume to the rocks. Once the rocks are done I can work on other elements of the background such as snow and pine branches and finally focus on the puma.

Here's the intermediate stage between last week's and now, which was where the black paint issue arised.:


Monday, 16 February 2015

Work in Progress: Puma

.. or cougar, or mountain lion, or one of the other dozen of names it has (I think I'm going to stick with puma) is my latest painting in progress.

The Puma is the largest of the small cats (Felidae) and the fourth largest cat with males around 2.4 metres from nose to tail. It ranges across the American continents from the southern Andes to the Yukon of Canada with larger animals generally further away from the Equator. The Puma and its sister species the Jaguarundi are the closest relatives to the Cheetah. It is a powerful ambush predator relying on short bursts of speed to catch its prey such as White-tailed or Mule deer. 


Here is my rough sketch on canvas for the painting. I'm aiming to put the puma somewhat sheltering from a snowy environment with snowed-up branches of pine peeking through but you can't really see that at this stage.

More to come soon!

Tuesday, 30 December 2014

The Osprey

For my latest painting I decided to paint a bird of prey - the osprey. And, to make it more challenging, I wanted to portray it in a more active and dramatic scene where it was fishing. I hope you like it!


With wildlife I try and make sure the animal I am painting is identifiable as a species. For this, as well as using what I can see, I also utilise ID guides in this case my trusty Collin's Bird Guide.


The osprey is one of the most widely distributed birds on Earth; spanning every continent except for Antarctica. In the UK it occured widely in the past but was persecuted as it competed with people for fish. The increasing pressure from firearms usage in the 19th century saw the osprey as well as the sea eagle pushed in extinction in the UK by 1916. In its final years, as it became rarer, the osprey became the target of trophy hunters and egg thieves. In England the last breeding pair was likely in Somerset in 1847. In wilder Scotland the population clung on longer, retreating into the Highlands where the last known pair nested at Loch Loyne in 1916. 

It was in 1954 at Loch Garten, Speyside, when a Scandinavian pair of ospreys was found to have recolonised Scotland and were breeding and the population has slowly climbed from there. As the population was slow to colonise opsreys were reintroduced to England at Rutland water in 1996. Later a pair bred in Kielder Forest in 2009 - the first to do so for over 200 years. Today the osprey population has reached a modest 200-250 breeding pairs. Sadly most breeding sites have to be kept secret as well as guarded to protect from would-be egg thieves and hunting - egg collectors have stolen over 100 clutches of eggs since the 1950s.
The painting in progress:


Friday, 19 September 2014

Work in Progress: Winter Fox Part 7

Not that much left to go now.


I add some fine darker details onto the fox's body and tail as well as some highlights but I largely work on the snow.

Using light bluey and pink whites I add these into the foreground and softly blend whilst trying to leave areas of more dishevelled snow and shadows. The more bluey and brighter tones of the foreground snow compliment the reflections in the fox's eyes and body and provide contrast against the darker background.

Part 8 coming Saturday.

Thursday, 18 September 2014

Work in Progress: Winter Fox Part 6

It's time for Part 6 of my Winter Fox painting. I suggest checking out the previous stages if you haven't already seen them this week.

Alright.. ready?

Here we go!

Now we're really going to bring in the winter sun and add bright white details to the brush and honey warmth to the body of the fox. But before that it's time to finish the head by adding the last of the fur around the cheek and the last whiskers in the shadow.


Using my finest brush I add littke fur details in the body along with broader sweeps of colour onto the hind leg. I did omit the details of a couple of holly leaves until now on the left-most twig so have filled them in.

I've also started on the foreground. It's just going to be of snow so I've added a mixture of dark blue and purpley tones in the shadowy areas so I can start adding the lighter tones later.

See you Friday for the next step!

Wednesday, 17 September 2014

Work in Progress: Winter Fox Part 5

More furring today. 


I've done some more fur details on the face but have largely been working on the lighter colours of the body. Oddly enough the lighter colours in the tail will actually probably end up more shadow as the tail will be in bright light. I've brought in more golden tones to the fur towards the middle (again another bright area) and added some small highlights into the dark fur.

I think it's time to start thinking about the foreground.


Tuesday, 16 September 2014

Work in Progress: Winter Fox Part 4

Here is Part 4 of my winter fox painting. Make sure to have a look at the previous stages of this painting on my blog as you follow me paint.

Now the time for furring and and adding highlights has come!


I've added some darker base tones to the brush making sure to work in the direction of the fur. As well as this I've also added the very darkest lines and areas of fur at the back of the fox. The biggest change has been the highlights on the face though. Adding the white, yellow, and blue highlights to the eyes helps bring them to life. And the brighter touches on the nose and highlights on the whiskers let you know that the fox has its nose in the sun. Here's a close up:


I've also worked on the fur details of the face and ears also the left side of the fox's face (that's on our right) is still relatively untouched. I try to make sure to work on areas that will be overlapped first (such as the jaw before the tail fur) to avoid awkward mark-making and keep things a little more natural.

Part 5 tomorrow.

Monday, 15 September 2014

Work in Progress: Winter Fox Part 3

Welcome to Part 3 of the Winter Fox painting. Make sure to check out Part 1 and 2 to catch up to now.

Now that the fox has been roughed out we can start to work on some of the dark areas and make the fox more opaque.


As well as working on some of the darks of the eyes, ears, and nose I've also worked a little on the fur edges that overlap the background. I've let some of the leaves fall in front and behind the fox but I'm probably going to introduce a new branch to 'tuck' the fox in. I've also added some lighter touches to the fox's brush and some base colours for a few whiskers.

A lot of dark colours have been added towards the back and rear of the fox as these areas will sit in shadow with the front in much brighter light. I've also added the snow onto the leaves behind.

In Part 4 we'll build up the fur and add the highlight colours into the eyes and face so they really 'pop'.

More to come Tuesday.

Thursday, 11 September 2014

Work in Progress - Winter fox painting Part 1

I thought I would share with you guys the current wildlife painting I am working on. It has a bit of a wintry theme going on. I'm pleased with how it is turning out so far and think it would make some nice little Christmassy (sorry I said the word!) prints. I hope to be able to do this in the near future with this painting as well as some other works but I'm not sure whether I'm going to use photos I take myself, invest in some more photography gear (ie lights), or see if I can find someone to take the photos.

As I am going on a little holiday to Iceland I thought that I would schedule stages of the painting to go up on my blog whilst I am away so you can see the painting progress. So from Sunday expect Part 2 and subsequent daily updates every morning!


Okay let's get started:

First, I wanted to create a wintery painting but I wasn't sure what animal to create a painting of. I decided against a robin as they are so overused but still wanted an animal that would fit nicely into a winter environment. One of my first ideas was to create a painting of a pair of bramblings - winter migrants to the UK in our colder months.. but I thought people would prefer a more well known animal. Although I still want to do this painting at some point. I thought about red deer bracing against winter blizzards and stoats in their ermine colours. But I decided upon the fox. There were 3 reasons for this: 

First a fox in it's winter coat is pretty stunning in the winter months and I remember seeing footage of one hunting through metre's thick snow in the TV documentary Yellowstone (you can find the clip on Youtube), secondly from a young age I loved foxes and even set up a little fox club and recruited everyone I could into it; and thirdly because I found a beautiful reference photo on MorgueFile that just worked really well with what I wanted to do.  This was to incorporate other seasonal aspects of nature: holly and ivy.


First job was to sketch out the fox and work on the positioning of some holly and ivy bush which the fox would be resting under. I sketched the image out in a muted blue so this would fit in well with the snowy background I was going to create.


Next I washed the background in a mix of blue and lavender tones to provide a base colour. I used a fan brush to allow for softer blending. This was left to dry so that a more opaque background layer could be created.


This more paint-rich layer was again softly blended. Greyer tones are also present to bring out the brighter areas that will be created on the fox and in the foreground later. Now it's time to add the leaves.


I added in some paler background leaves and branches. You can see the start of some darker leaves which I will spread out as well as berries and a trail of ivy leaves along the edge. 

These will be detailed in Part 2 this Sunday. Keep an eye out for the daily updates coming from then.